click map Home Tutorials About FAQ

Monday, January 31, 2011

Giveaway #2: Green Bag Lady

A couple months ago I came across the Green Bag Lady's site when I was looking for inspiration for my blog. It's run by Theresa who gives away free fabric bags using donated fabric to encourage people to stop shopping with paper and plastic. So far she's given away over 14,000 bags (!!) and is still going strong. I won a bag a couple months ago and they're lightweight and fold up small so you can easily keep them with you without taking up a lot of storage space. Plus the bags look great AND help the environment. Who wouldn't want to put their groceries in one of these bags rather than plastic or paper?


This is a unique givaway because if you've never won a Green Bag Lady bag before you are
GUARANTEED to win one if you leave a comment with your e-mail and telling her which Daisy Janie fabric (some prints are pictured above) is your favorite. Comments close at 1:00 AM EST (Midnight CST).

Giveaway #1: Stoney Creek Shops


My friend Beth is hosting a lined berry basket giveaway (pictured above) on her blog over at Stoney Creek Shops. Beth has a distinct vintage style and she's great at paying attention to the small details that really bring everything together. I recently took some photos of her house and you can see here how great she and her husband are at decorating in vintage style.

Beth also runs two Etsy shops where you can purchase the items she makes: Stoney Creek Mercantile and Eva Mae's at Stoney Creek.

Here's a couple of my favorite items that she sells:


Sunday, January 30, 2011

Tutorial: LOVE Shirt

My sister visited this weekend and we decided to make her a shirt for Valentine's Day based on the LOVE statue in Philadelphia. If you need more instruction, I'll do a more detailed tutorial on how to make an applique later this week so this one will be a bit more brief.


First I ironed Wonder-Under (specifically Pellon 725 Heavy-Duty Wonder-Under Transfer Web) to the back of the fabric we chose. Then I traced the letters onto the fabric using a stencil we had created of each letter. You can download the PDF of the letters for personal use here. Then we cut out each letter, peeled off the Wonder-Under backing, positioned the letters onto the shirt then ironed them down. Then I did a zig zag stitch around each letter and project complete! We found the plain long-sleeved gray shirt at Target in the men's section. They had a variety of colors and they had a few in the boys section if you need a smaller size.

Here's a close up of the letters. We chose a navy quilting cotton for the L, V, and E. For the O we used a fabric with tiny forks, spoons and knives. My sister is loves to bake (she's fabulous by the way) and she's single so this shirt is subtly dedicated to food love.

Sunday, January 23, 2011

Tutorial: Custom Tees


I was checking out the Crap I've Made blog a couple days ago and saw this great paint product. Tulip's Soft Velveteen Fabric Paint. After drying you steam it with an iron and it changes texture to a flexible soft raised almost rubbery feel. Despite being the coldest day in ages, my toddler and I braved the weather to go get some of this paint. It was even on sale at JoAnn's so it was meant to be.


I decided to do an Elmo shirt but just think of all the letter stencils, t-shirts, tote bags, household items, monogrammed pillows, aprons, and who knows what else you could use this on! Char at Crap I've Made used it to make letters on a Valentine's Day bunting (check out the blog link above, she has a lot of great projects and tutorials!).

The shirt I'm using is from Wal-Mart's Garanimals line. For $3.50 they have solid color boys or girls shirts (the girl shirts are cuter than the boys, as usual) up to size 5T. I found the Soft Velveteen paint in 3 of the colors I needed, red, black and white. They didn't have orange or yellow to mix with the red so I ended up getting just a matte finish orange.

I started by making a stencil. I then made 4 copies of it and cut out the openings for each of my 4 paint colors. I used card stock paper for my stencil. It worked okay for one use but it did start to curl a tiny bit after the second coat of paint. Freezer paper would have been a better choice.


I pre-washed the t-shirt and I put cardboard inside underneath the areas I was painting. I chose to do a bigger Elmo on the chest and a little one on the wrist so the wearer could see it.

I used Duct tape repositionable Easy-Stick tape to hold my stencil in place. This was especially essential for the extra mouth piece that wasn't connected to the main stencil. Just make sure to get the adhesive around your stencil so the paint doesn't bleed underneath too much. You could also use spray glue. Then I used a sponge brush to put on 2 coats of paint in each color.


I ended up doing the red, orange and white with the stencil and just used a small brush to paint in the black. The paint bled a tiny bit under my stencils so I wanted to cover those imperfections accurately when I outlined the whole image in black.


And here's what I had after all the paint had dried for 4 hours (as the paint label recommends):


Now for the magic. After painting the image was slightly textured from the way I used the sponge brush, but it was still flat. Then I heated up my iron on the steam setting and held it about 1/2" above the fabric while it was steaming (you have to have steam, just heat won't work). Then the paint puffed up and turned into a whole new texture! I tried to get before and after shots but it's still hard to see. The photo was taken when the paint was still hot and a little wavy. It smoothed out after it cooled.


And here's the final shirt modeled by the lucky (thrilled...) recipient! Other than the drying time in between the different colors of paint this was a pretty fast project.


PS. If you need help finding a kid's character image try out these websites and the coloring pages:

These two sites have both printable coloring pages and coloring related games such as mazes, paper dolls, bookmarks, mobiles and more:
Just coloring pages (check both PBS links for your favorite show because they each feature different shows):

Monday, January 17, 2011

Want a free fabric bag?

The Green Bag Lady is having a fabric shopping bag giveaway! I was lucky enough to win one of her bags in an earlier giveaway. They're cute and lightweight, perfect for storing in your purse and using at the grocery store or farmer's market. Or for whatever since bags are pretty versatile. You have to enter by January 18 at midnight (CST) so get moving!

Friday, January 14, 2011

What do you want in a blog?

If you have some time and want to help out a new blogger, what are some things you look for in a sewing blog? Do you like seeing photos of completed projects even if a tutorial isn't included just to see what I'm up to? Do you like the tutorials as part of the website or would a downloadable PDF also be helpful? Anything the site is missing that you'd like to see?

Just trying to get some ideas for improving the site. Thanks so much for visiting and I hope you're enjoying things so far!

Tutorial: Totes Big and Small


It seems like I'm always leaving the house with something...dinner for a friend, toys for my toddler, extra pair of shoes or who knows what. I usually grab a Bath and Body Works bag or a plastic mega-store bag but in the interest of looking less "mom-frump" (my term for how I often feel these days) I thought a nice set of tote bags would help me look a bit more pulled together. Here's the first tutorial in the series on some different tote styles. Later I'll do a second one on a version with a pocket and different handle straps.

You can scale the size up or down for whatever purpose you have in mind. I make two sizes generally. One is a small tote the same size as one of the paper Bath and Body Works bags you get at their stores. It's great for a few toys, extra shoes, or even wrapping up a gift. The larger size is great for grocerices, farmer's markets, extra toddler clothes/toys when going out for the day, as a beach bag, for a change of clothes for the gym or whatever else you can think of. It's about the same size as a paper grocery bag.

For this pattern you'll need an outer fabric and a liner fabric. I like at least one of the fabrics to be a heavier weight to help the bag hold it's shape a little better. All seam allowances are 1/2" unless otherwise noted.

1. Small size: Cut out a 15" square from both of your fabrics. At each of the bottom corners cut a rectangle 2 1/2" tall by 3" wide. If the fabric you're using doesn't allow you to have the fold at the bottom you'll cut a rectangle 15" wide by 15 1/2" tall, and your corners will be 3" square.
Large size: Cut out a 20" square from both of your fabrics. At each of the bottom corners cut a rectangle 3" tall by 3 1/2" wide. If the fabric you're using doesn't allow you to have the fold at the bottom you'll cut a rectangle 20" wide by 20 1/2" tall, and your corners will be 3 1/2" square.

2. Turn your fabrics right sides together then stitch the sides.

3. If you have a raw edge rather than a fold at the bottom, stitch that together.

4. Create the bottom of the bag by stitching the corners. See below for photo detail. You'll stitch all 4 corners (the 2 for the outer fabric and the 2 for the liner).


5. Your outer fabric and liner should now look like this and you can iron the seams flat.


6. Now flip the outer fabric right side out, then nestle the liner inside.


7. Now pin along the bottom of the bag on the front and back, but not the sides. Stitch along the edge with a 1/8" or 3/16" seam allowance.


8. Fold the raw edges of the top of your bag in 1/2" and pin. Also, tuck the straps about 1" down in between the two fabrics and pin in place. I used these cotton straps from JoAnns but you could also make them out of a coordinating fabric. For the small bag each strap is 14". Fot the large bag I wanted something I could carry by hand or over my shoulder so it's 26".


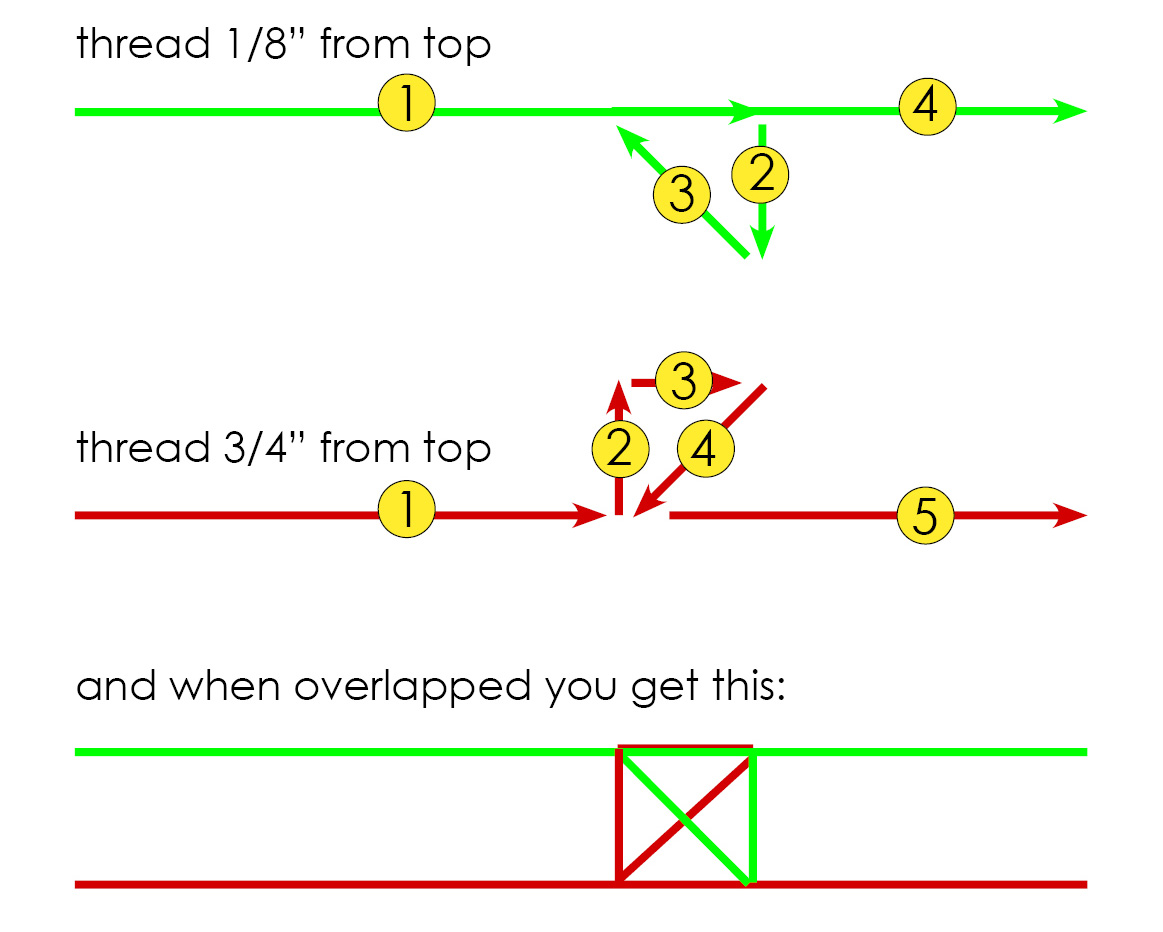
9. Now stitch around the top. Leave a 1/8" seam allowance at the top and then sew a second seam 3/4" down from the top. Then go back and put an X over each strap. Or if you don't want to have to go back and do the Xs later, see the diagram below for the exact steps I followed.


10. Optional: If you want your tote to have a boxy shape, pin the 4 sides going straight up from each corner then stitch 1/8" in from the edge like you did in step 9 around the top.

And now your project is complete!

Wednesday, January 12, 2011

Print your own fabric!?

So maybe I'm behind in sewing news, but I just found this site where you can design your own fabric and have it produced! Say hello to http://www.spoonflower.com/. If you don't want to make your own designs you can browse user uploaded fabrics to purchase. There's a lot of great (and unique!) designs.

If you do like to design they have a weekly themed fabric contest. I just uploaded a design for their Rococo themed contest that starts tomorrow.

Tutorial: Sink Skirt


This project starts with a little story. Five years ago my husband and I bought an old historic home. It was built somewhere in the mid- to late-1800s. The house had been empty for a couple years and raccoons used it for part of that time. We had this little gross closet (see left photo above) that I wouldn't store anything in so my dad suggested we turn it into a bathroom.


I'll spare you the drama of putting in the bathroom, but we ended up with the little beauty in the above right photo! You can see that the pipes under the sink are still visible. That brings us to this project. A sink skirt was the perfect solution to hide those pipes and add some extra character.

MEASURING:
Width: I started by measuring around the top of the sink. I then added 1" to that measurement so I could hem the sides. I decided to use 5 box pleats around the top. For each pleat I added an extra 4" (you'll loose 2" for each side pleat). This bathroom is 3 feet x 5 feet so that sink is super small. For a larger sink you may want more pleats.

Height: Measured the height I wanted the skirt from the rim of the sink to below the pipes. Added an additional 4" for hemming.

SEWING:
After cutting out my fabric I hemmed the left and right sides. Then in the center I pinned down a box pleat. Each pleat is 2" wide with 1" pleats so the folds will almost touch in the back. From there I pinned each of the two side pleats. Then I sewed a seam across the top to hold them all in place. I then folded the top back 1" twice for the hem. The extra wide and sturdy hem will be where you later place your velcro.

I did the same process for the bottom except for making the pleats larger to the point that they overlapped each other.


FINISHING:
After I had the skirt finished, I used sticky velcro squares and attached one side to my sink and one side to my sink skirt. The ones on the sink stuck really well but the ones on the fabric lost their hold when the unheated bathroom reached arctic temperatures. After that I handstitched the squares to the fabric but the stickyness made it nearly impossible to push the needle through and now my finger is full of holes. You can benefit from my suffering: I would recommend sticky velcro for the sink and nonsticky velcro stitched to the fabric. I used 5 squares, but again, it's a really small sink so you may need more. Now it's ready to be attached and you're all done!